How to Use Instagram to Generate Organic Leads
Are you using Instagram to connect with new prospects? Wondering how to generate leads without using Instagram ads?
To explore how to use Instagram for organic lead generation, I interview Jenn Herman on the Social Media Marketing Podcast.
Jenn is an Instagram marketing expert and co-author of Instagram For Dummies. Her live course is called Instagram Intensive.
Jenn explains how to optimize your Instagram profile for lead generation. She also shares several ways to optimize Instagram content to give it the best chance of converting Instagram viewers into leads.
Listen to the Podcast Now
This article is sourced from the Social Media Marketing Podcast, a top marketing podcast. Listen or subscribe below.
Where to subscribe: Apple Podcast | Android | Google Podcasts | Google Play | Stitcher | TuneIn | Spotify | RSS
Scroll to the end of the article for links to important resources mentioned in this episode.
Instagram for Lead Generation
Instagram is probably not the platform most people would think of first for lead generation. A few years back, someone told Jenn that lead generation wouldn’t work on Instagram. Jenn thought, “Challenge accepted.” She knew it could be done but she’d never put a solid method behind it before. She decided to make it her mission to show people that they could do it.
The reason it works is that Instagram is so good at driving high-quality traffic. You don’t get a lot of traffic from Instagram but because users have to first see the content, read the caption, click on the link in the bio, and then get to that destination, they’ve already taken three or four steps to get there—which means they genuinely want to be there.
You’re more likely to get a high-quality conversion, which is how you get people to sign up for webinars or registrations, do the downloads, get on your email list, and so on. You get those high-level conversions from a platform like Instagram.
We’ve been so focused lately on Instagram’s bright shiny object, Stories, and all of its beautiful images that we forget that you can get people to take an action that can drive them off-site. We’ve all kind of given up on that. We think that if we don’t have the Swipe Up feature on Stories, we can’t drive traffic.
But there are some workarounds you can use, even if you don’t have the Swipe Up link, to get people to your website, your profile, the link in your bio, or wherever else you’d like them to go.
It starts with whatever your funnel looks like. You might be looking for direct sales out of a post in your stories or on your feed. You might be looking to grow an email list or get people to show up at an event. Maybe you’re in a non-profit industry and you’re trying to generate more awareness. You could even use it to grow your podcast listener base. Whatever lead generation is for you, you can absolutely use Instagram to push them there.
Optimizing Your Instagram Profile
First, your profile has to be set up and maximized for that type of conversion. You have to write Instagram captions that are going to get people to follow through on a call to action. Your content has to get their attention in the feed to get them to even read the caption. And finally, you need to look at metrics and insights within your Instagram content to understand which type of content is actually driving the conversions because high-engagement content may not be high-converting.
Name and Username
The name and username are the only searchable criteria on Instagram, which means whatever you put in your bio isn’t actually searchable at the moment (though there are rumors it’s in testing). So if you’re an Instagram expert, you won’t show up in search for “Instagram expert” if it doesn’t say those words in either your name or username.
“Blogger” is in the first line of Jenn’s bio, and is also the category designation under her name. Jenn built her whole business on being a blogger; that was how she started out. She became the world’s forefront blogger on Instagram marketing. She’s known as a writer so people usually come to her from some sort of written content. Even though she does more video and audio now, she’s still known as an author and blogger first, and then as a speaker and consultant.
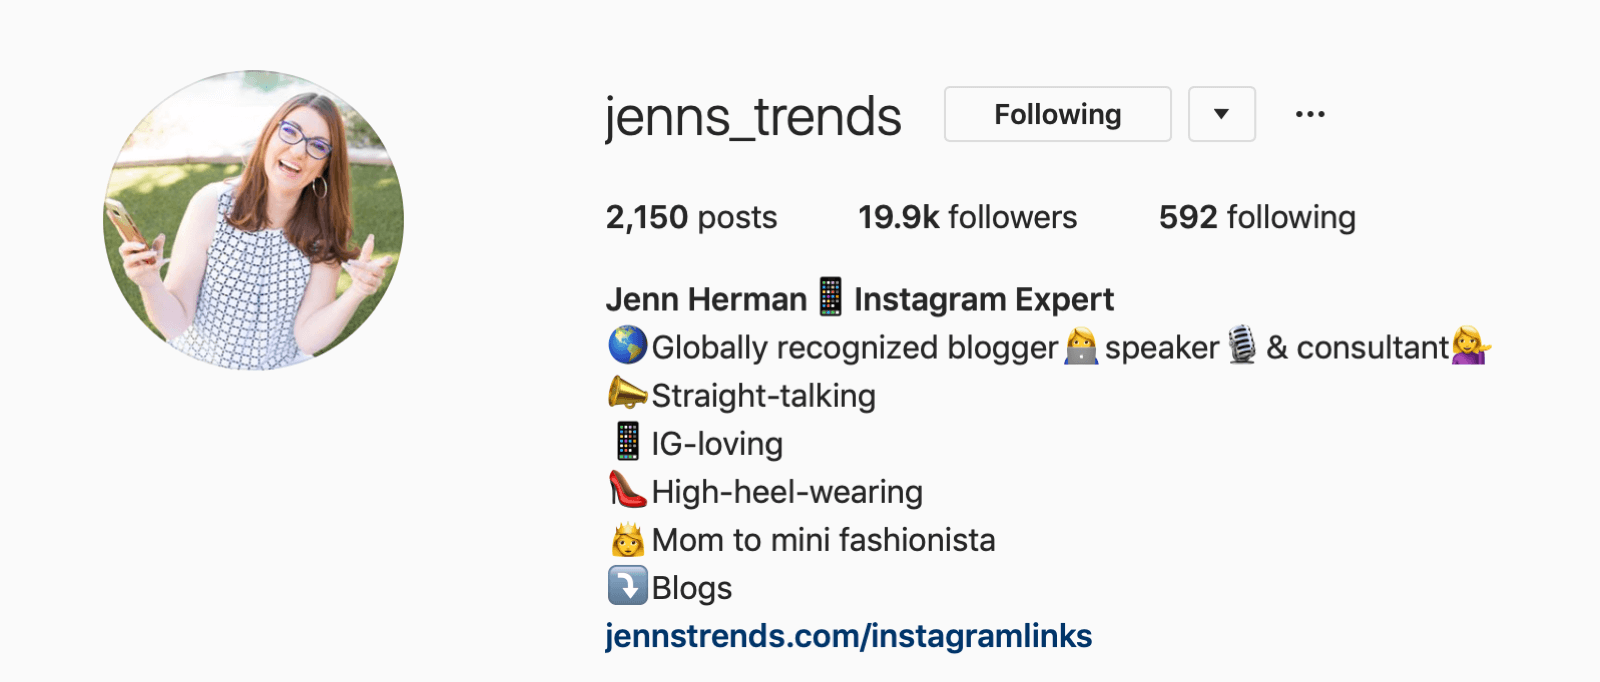
Your “name” can be more than your name, and you can also use emojis. The appearances of some emojis differ slightly between operating systems but they’re essentially the same on both Android and iOS devices. It’s preferable to use emojis to separate words, not necessarily to replace them. If you’re really tight on characters and you can find a clear emoji that replaces a word, go for it, but emojis can be easily misconstrued.
Instagram Bio
Jenn says people’s bios are often inadequate or inaccurate because they’re written in marketing-speak. They wrote their bios when they first started their accounts, and now they don’t know what’s in there or why.
The bio is your 30-second elevator pitch, and it’s usually the first impression when somebody comes to your profile. Most of the people who read your bio are only going to read it the first time they come to your actual account. Once they’re following you, they have no real reason to go back and read it. So the bio should be written for a first-time visitor.
It should clearly communicate who you are, what you do, and what’s in it for the viewer who’s reading it. It should also contain some sort of call to action such as an arrow pointing down to your URL. It should give that first-time visitor a really clear message of who you are. Feel free to use emojis and slang, and show your personality and voice—you only have 150 characters to do this so it’s not a lot of space.
Jenn advises having somebody else write your bio for you because people are usually horrible at writing their own bios. You either want to write 4,000 characters or you just want to speak about your business the way you see it, not the way your customers should see it. Ask your employees, family, friends, or a colleague to write it for you.
Jenn’s Instagram bio was written by Elisa from Tailwind. Elisa wrote up Jenn’s bio for a podcast, and Jenn asked if she could steal it because Elisa had captured her personality in a way that Jenn never would have been able to do herself. You want to make sure a new audience understands really quickly the value in following you—and in taking actions such as clicking on your links or action buttons.
Your bio can be 150 characters. If you generate a long-form paragraph, that’s about five lines of text. But typically, you don’t want a long run-on paragraph; it doesn’t read well, and it’s not visually appealing. Jenn recommends short, individual bullet points with a cute emoji at the start of each line that relates to the content of that bullet point.
Putting line breaks into your bio can be tricky. Android users have an easy-access return key; it’s a bit more hidden in iOS. You can build your bio in a note on your phone first and then paste it in. The key is that you can’t have a space as the last character. You need to backspace all the way up to the last letter, number, or punctuation mark and then hit return.
You also can’t have an emoji as the final character on the line. If you do that, when you hit return, the return doesn’t count. You’ve got to make sure that the last character is either a single punctuation mark or a single character.
Jenn also advises being aware of what lies above and below “…more.” Make sure the first sentence or bullet point is a very clear description of what your business is, the most obvious definition of what you do. “Mom to a mini-fashionista,” is one of Jenn’s bullets. However if that were the first item, people would assume her profile was about children’s fashion. They wouldn’t think of her as an Instagram expert.
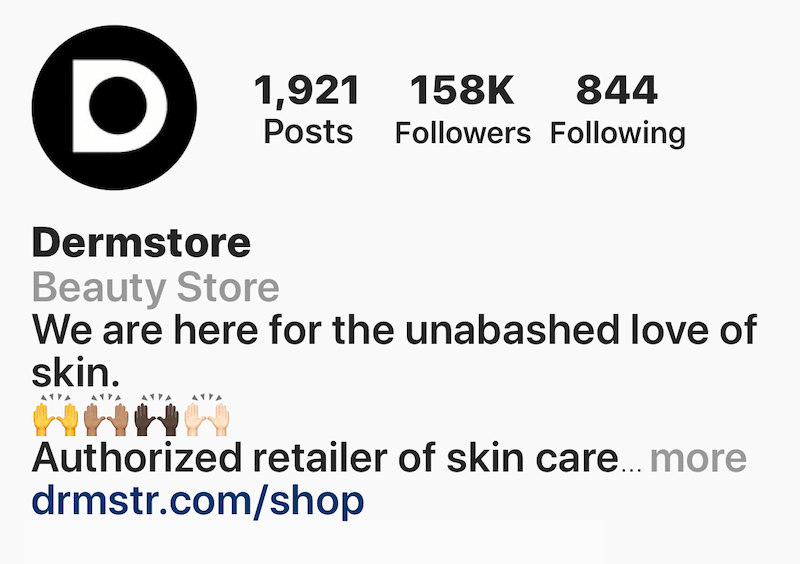
Make sure that the first bullet point is clearly descriptive of your actual business mission. Then add some personality into those subsequent bullets—more of the quirkiness and fun factor that distinguishes your brand.
Link in Bio
The URL below your bio is super-important because that’s your one good clickable link anywhere on Instagram. You want this to go exactly where you want visitors to go. You want to send them to an actual destination.
A lot of people use a service like Linktr.ee that creates a landing page where you can list multiple links. Jenn recommends setting up a designated landing page on your own website that is clear of any pop-ups, sidebars, or distractions, and to basically recreate a Linktr.ee-style multi-link environment on that page.
You can have three, four, or five specific links there because now you own that traffic, so you can retarget them with ads. You can look at your Google analytics and see where they’re going. This is key when it comes to managing your lead generation because you want to know that users came from Instagram to land on this page.
Where did they go from there? Are more people clicking on a webinar registration than on an eBook download? Do you have more people clicking on your course information than you have on your blogs? Having your own landing page allows you to track those metrics of where they’re going and how long they’re staying on your site so you can better target your audience.
Usually, you want this landing page to be somewhat hidden so it’s not a published URL that you would use anywhere else. It could still potentially be found in a Google search or some other location if it’s public on your website; however you generally want to minimize the risk of any sort of cross-contamination so you can more accurately measure those analytics. And you’d only want to use that link on Instagram.
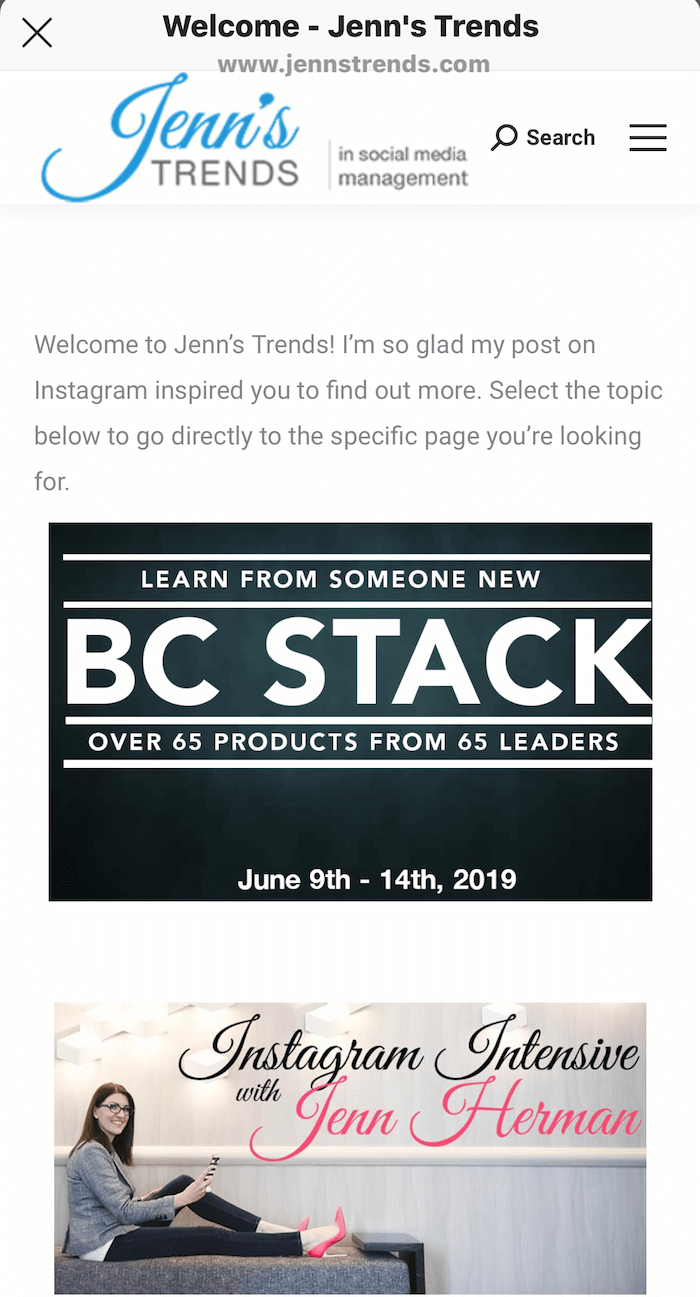
To illustrate, Jenn’s is jennstrends.com/Instagramlinks, which goes to a dedicated landing page with six clickable images. She recommends limiting your page to a maximum of five or six options; if users have to scroll too much, they’re not as likely to click through. Jenn’s landing page header says, “Welcome to Jenn’s Trends! I’m so glad my post on Instagram inspired you to find out more.” She’s specifically calling out the fact that you’re coming from Instagram, which personalizes the user experience.
Instagram Action Buttons
If you have a business or creator account, your profile can feature Instagram action buttons. Jenn says these are more useful for actual sales than for lead generation.
Call, Text, Email, and Directions are the four default action buttons. But business profiles now have expanded options including Book Now, Buy Tickets, and others, many of which are linked to third-party tools.
To visualize this, if you use Eventbrite to sell tickets and you already have an Eventbrite account, you can link that button through Eventbrite. If someone is looking to buy tickets to your event, they can actually click on the Buy Tickets button directly from your profile, open the Eventbrite page, and complete the sale without ever leaving your Instagram profile.
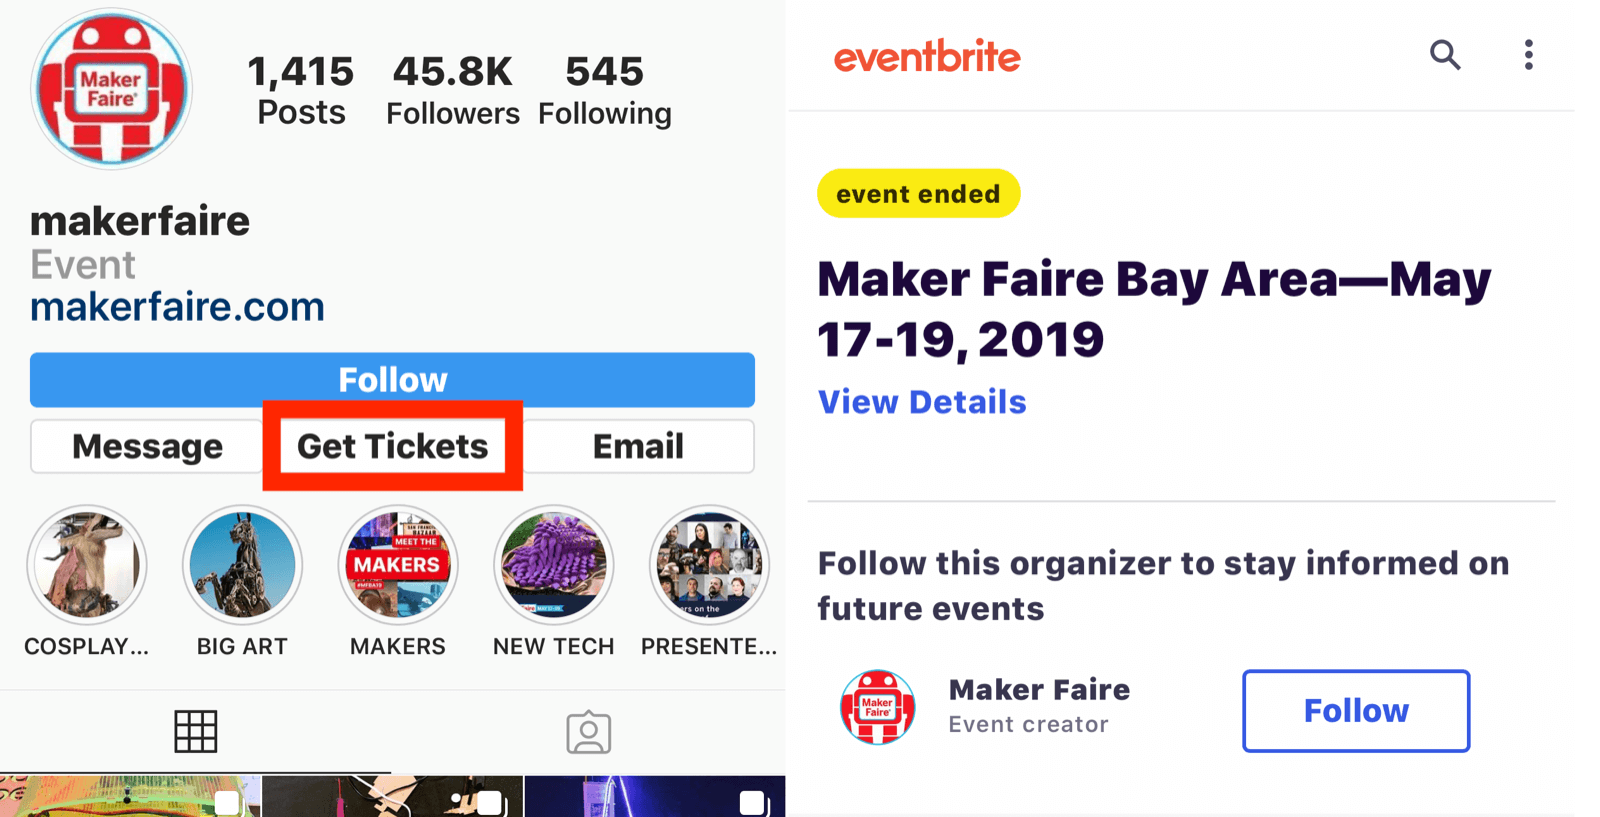
If you’re using Instagram for list-building or other types of lead generation, you do still have to rely on the “link in bio” call to action and format to get people to that landing page. The action buttons focus more toward direct transactions.
Instagram Content That Converts
Instagram Captions
Once you’ve built your profile, the next place to concentrate on is your post captions because they get users to the link in your bio.
Your Instagram caption has to have a really strong opener. When you’re scrolling through Instagram, you see the photo or video, and then you see the username, one or two lines, and “… more.” The caption is truncated; you’ve got at most two lines of text, including the username. There’s no preview option so you just have to guess from experience where that caption will cut off.
If your first sentence is some rambling randomness that makes no sense and isn’t motivating for visitors, they’re not going to click “… more” to read your caption—which means they’ll never see your call to action. And that’s why you really want a really strong opening. Whether it’s five words or 20 words, you need to capture their attention right off the bat.
Think of that first sentence like a great blog post title, a great email header, or something that’s really going to get them to click. Use emojis and capital letters, draw their attention, make a bold statement, ask a question, something that makes them click “… more.” Now they’ll read the caption.
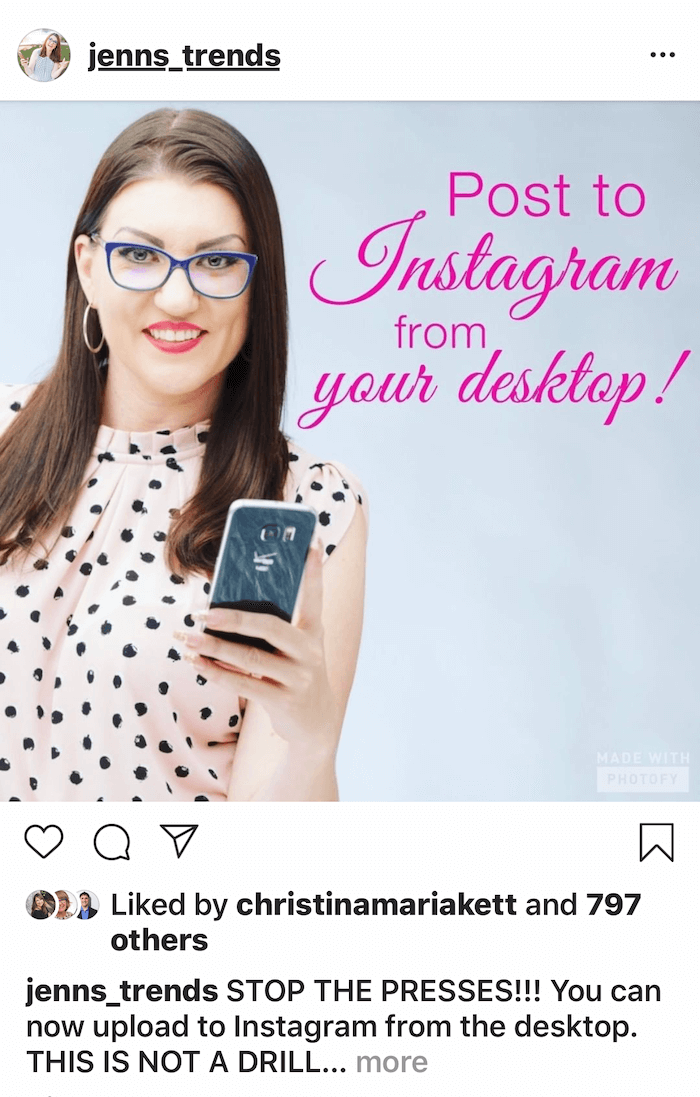
Within the caption, have some sort of call to action such as asking them to click on the link in your bio. You can put some emojis around it, put in capital letters, or make it stand out so people see that very clear call to action.
Instagram doesn’t provide analytics on how many people click “… more,” but the algorithm does recognize it as a positive action and it helps your content rank better. It’s an engagement metric but we don’t get to see it. You may have people reading all of your captions but if they don’t like it or leave a comment, you don’t know that they’ve taken any action on it.
It’s key to know what your content’s purpose is and know who your target audience is.
Jenn does a lot of educational content and will start off in capital letters, “BREAKING NEWS” or “INSTAGRAM NEWS” so people know immediately that this is something they’re going to want to know. Sometimes she’ll use stars or fire symbols.
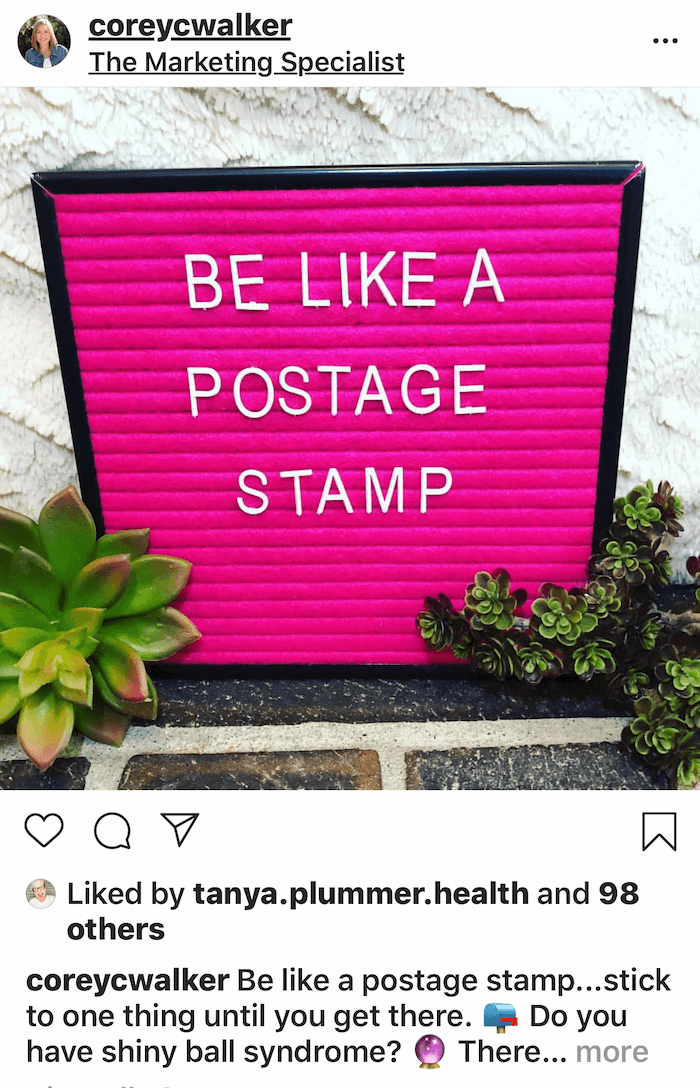
One of Jenn’s co-authors wrote a post that started out with, “Be like a postage stamp…” People were intrigued by what she meant by that and they clicked. She continued with, “Stick to one thing until you get there,” and went on to talk about shiny-object syndrome.
The purpose of the post had nothing to do with a postage stamp; it was her metaphor to get people in and it was intriguing because people didn’t know what it meant at first. People clicked on it to see where she was going with that story. It motivated people to find out.
Do People Look at the Picture First or the Caption?
It depends on the image and sometimes the source. If you see something from the local news station, even if you don’t get a lot out of the photo, you’re more likely to look at the caption because you know it’s a news story and you want to see if it’s relevant to you. But then there are some people whom you follow for their pretty pictures, and you may not even care about the caption because you just want the pretty pictures.
Similarly, you need to know what the purpose of your content is so you can train your audience to do what you want. If they’re not used to you writing good captions or having calls to action, you have to start training them slowly by using shorter captions. Don’t use long ones. Don’t put a call to action in every single post. Start out with something witty, some entertainment value, to capture their attention and encourage them to click “… more.” Give it at least 3–4 weeks to build this up. As people get used to it, then they click more frequently and you can start doing more calls to action.
Call to Action
The most common call to action that everyone recognizes is, “Click on the link in my bio.” It sounds so redundant but everybody intuitively knows how to get there.
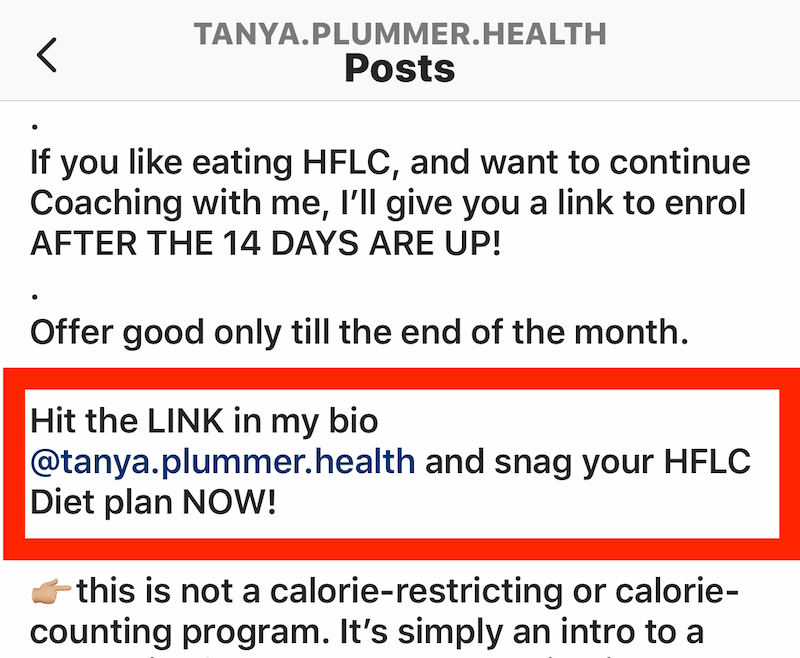
Jenn’s friend Tanya writes really long captions, but then down at the bottom where she says, “Click on the link in my bio,” she actually lists her username again. It becomes more clickable, rather than having to scroll all the way back up in the caption to go back; it’s basically tagging herself.
It makes it super easy because now if someone is scrolling—and we all want to save that half-second of our lives by not scrolling backward—she says, “Click on the link in my bio at @Tanya.Plummer.Health.” Boom. They don’t want to scroll backward. They’ll do it, but the easier you can make it for people, the more likely they are to actually pursue that action.
There’s no definitive word count on captions, but they’re limited to 2,200 characters. That’s a good long scroll; you can microblog with that. Line breaks work the same as in the bio; just make sure there are no spaces at the end and don’t use an emoji as the last character. If you have that emoji in there and you hit the return key, it looks fine when you’re writing it, but as soon as you hit Publish, that return is eradicated for some reason. If you prep your caption on a Google or Word doc and copy/paste it, those returns do work as long as there’s no space at the end.
Attention-Grabbing Instagram Content
How do we get their attention? That’s the hardest part. People are scrolling through a busy Instagram feed and it’s constantly moving. You need your content to stop their scroll.
Jenn always tells people not to use her account as an example; it’s the opposite of what she tells people to do because it’s usually a photo of her with a text overlay. She doesn’t actually like using text on images on Instagram. But in her case, from an educational perspective, the moment people see her photo with a text overlay that says, “New Feature,” “Breaking News,” or “Instagram Update,” they stop immediately and take action on that post. A lot of her content looks like that and it drives a ton of engagement and conversions for her.
One of Jenn’s recent posts says, “Wait! Stop! This is crazy!” in her branded font and colors, with a picture of her holding up her hand. She was literally telling them flat-out to stop. The post contained an offer for the BC Stack, a special limited-time promotion on a collection of marketing products. This post got a ton of engagement. It was a converting-based post. It wasn’t meant for engagement, it wasn’t meant to get likes; it was meant to get clicks.
When it comes to content, we just want to get people’s attention. Maybe that means bold colors; maybe it’s minimalist design. If you have a really busy photo with a lot of colors and distractions, it’s easier to scroll past that. If you have a very muted, white and gray background with a beautiful pop of yellow color, it’s going to stand out on the feed and visually capture attention.
Jenn has seen brands that utilize a solid-colored wall—so they’re next to, say, a blue wall—and the object of focus is placed in front of this bold color in a very minimalist way. It’s going to drastically change what they’re seeing in the feed against the white background, the text, and all these other busy images. So minimalist can work. Something with certain color patterns—usually blue, Jenn says—gets people’s attention better.
Words on Images
On Facebook we’ve been told—at least on ads—not to use too much text on images, although there appears to be no such guideline on Instagram.
You still can’t have text covering more than 20% of images in ads because Instagram uses Facebook’s advertising tools. But in terms of organic content, there appears to be no negative impact, aside from the fact that most people on Instagram don’t want to see words on images. They want pretty pictures and they want videos; they want something visually appealing.
If you’re taking a graphic with a banner and a whole bunch of text and a date and a time and directions and all these things, that’s probably going to fail on Instagram because it’s way too cluttered and busy, and it just doesn’t look Instagram-worthy. That’s not what people want to see on the platform.
Frequency of Instagram Lead Gen Posts
You don’t want every single post to be a promotional post; that applies to any platform. Not everything is a sales pitch. It really comes down to where your action-based content falls.
If 60% of your content is fluffy engagement-type content and 40% is CTAs, then those posts may be where you put some sort of wording on the image itself—minimal, just a few words. Even when you look at Jenn’s, they’re usually something like, “Instagram News.” It’s minimal text content to avoid detracting from the actual image, but just enough to capture people’s attention.
You could also post a creative image with no words on it that will stop them; for instance, a picture of you making a crazy face with the caption, “Wondering why I’m making this crazy face? Because I’m so excited to tell you about something…” The photo gets their attention because you’re being over-the-top. The caption is now going to tie it in but you’re not giving it away just yet. It’s going to force users to click “… more” to figure out why you’re so excited.
Instagram Image Carousels
Jenn didn’t always love image carousels on Instagram—but she does now. Before, people didn’t really understand the whole concept of swiping left and right, and it was confusing. But now Instagram has actually started to re-show carousels if they’re ignored the first time they appear in someone’s feed.
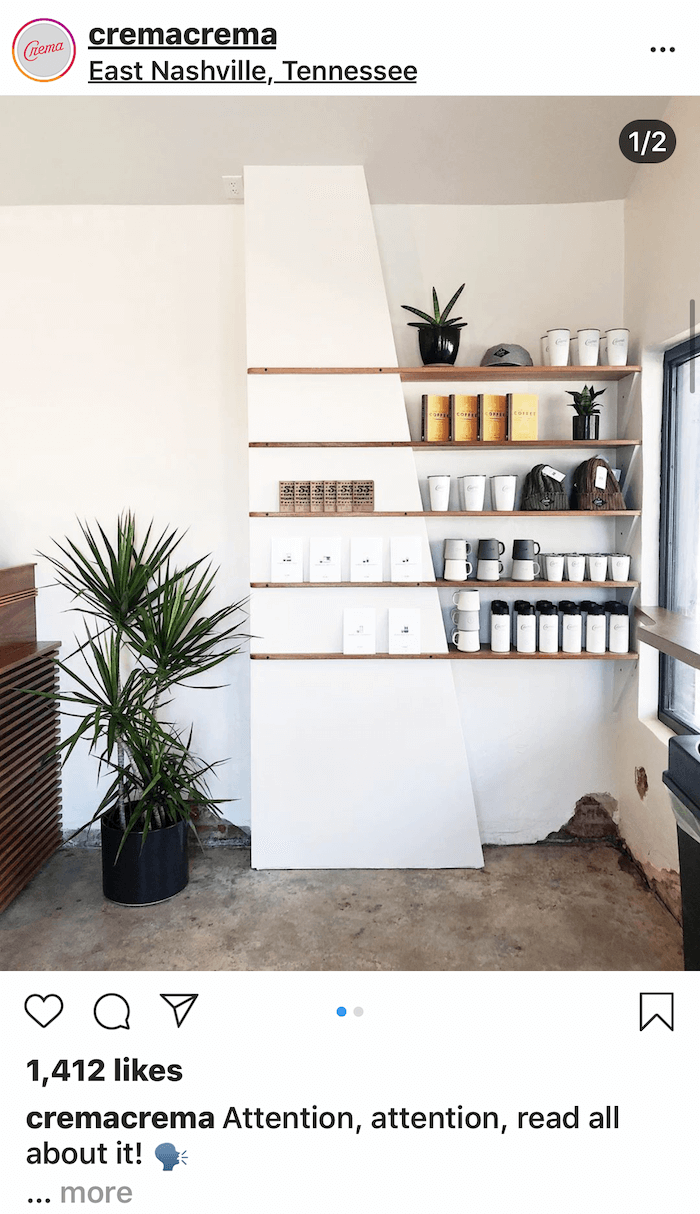
When there are two or more images or videos in a post, if you don’t respond to the first image when you see it in your feed—meaning you don’t click “… more,” and you scroll past it—Instagram will now show it to you again. Instagram’s algorithm chooses which of the subsequent images to show you based on your personal algorithmic interaction so it looks like a different post.
This creates greater chances for exposure; if people don’t like your first image, you get to show it to them again. It’s almost like a little split test. Unfortunately, Instagram doesn’t currently show us the analytics on which images perform best.
Jenn used to recommend putting a little arrow in there for people who missed the dots below a multi-image post to indicate that there was more to see, but at this point, she says enough people know how it works and can swipe on their own. People used to put “Swipe Right” in their captions, but now that just uses up valuable caption real estate. If they do swipe, though, if they’re in any way navigating through those images, even if they don’t like it or leave a comment, the algorithm is ranking that content for them.
Instagram Video
Video is great—but Jenn says it gets no preferential treatment in the feed. Videos and photos are treated exactly the same by Instagram’s algorithm.
It’s up to your audience. Jenn’s audience knows she doesn’t do videos. If she posted a video, she suspects it would tank. But certain podcasters or other people whose audiences are built around video and audio content are more likely to have better results. Videos can be up to a minute long so you can put a call to action in there, and explain what the lead magnet is, why they’d want to sign up, or what they’re going to get out of coming to the event, etc.
Now we’ve also got IGTV, which is a huge component of tying into lead generation. IGTV videos get a 1-minute preview in the feed. When the preview is over, viewers can go over to IGTV if they want to keep watching.
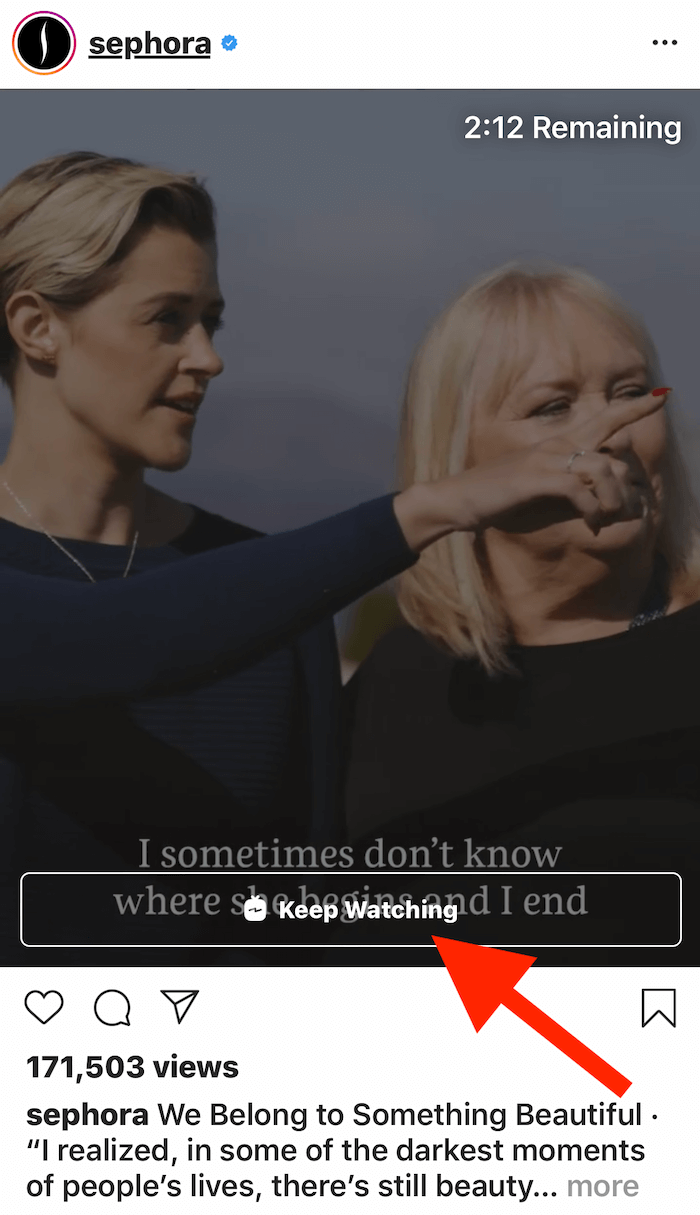
Even if you don’t have a Swipe Up link on stories, anybody can put a link in the caption of an IGTV video. You can use up to 30 hashtags on your IGTV videos in the description, and you can put any link on any account on IGTV. But it won’t show up until they switch over to IGTV, so they have to follow through.
You have to make that first minute of your IGTV video really good and compelling to get them to go over to IGTV and watch through. But once they’re there, you could keep them for a minute and a half, a minute and 15 seconds; they only have to watch a few more seconds once they get to IGTV. And, now on IGTV, they’ve got a clickable link in the description for your call to action that says, “Make sure you open the description of this video and click on the link.”
To clarify: the caption that shows up on the Instagram preview will be the caption from the IGTV video. The link just isn’t clickable on the preview; it becomes clickable once they’re watching over on the IGTV tab.
Image Shape/Size
Square images or vertical images with a 4:3 ratio are great for taking up as much of the screen as possible. Horizontal landscape videos and images aren’t good because you lose that real estate on the top and bottom. Square images maximize the real estate as it’s built for the platform. Vertical 4:3—think portrait mode, slightly taller than wide—gets a little more real estate in the feed and is thus more likely to capture attention. You have more space to scroll past. It’s more time for them to stop and take action on that image.
Instagram Stories
A story sequence can absolutely lead people to your website—however, you need to get them there. If you don’t have the Swipe Up link, then at the end of your sequence, you can say “Click on the link in my bio” and tag your handle. This way, users don’t have to go back out to your profile; they can just click the hyperlink in your story.
Jenn will sometimes put a clickable tag to her profile in a story, minimize it, and put a GIF sticker right on top of that tag that says, “Click Here.” They don’t even see the username behind it; they just see the sticker. And when they click on that sticker, because the tagged username is behind it, it’s now basically a hyperlink sticker.
A Note About Dark Mode: Jenn warns that the increasing prevalence of dark mode on both Android and iOS devices means that if you’ve been designing images to pop against a white background, you now have to consider what your content looks like on a black background as well. If you’re doing black-and-white images, make sure they have a good contrast level against the black.
If you’re really paying attention to this, you can see if you experience a shift in that engagement. Everyone can use dark mode but not everyone will, so it’s a split demographic. Some people turn on dark mode automatically at a certain time, which means they could see two variations of the same piece of content in the same day.
You can use Photoshop or another design tool to get an idea of how your content looks. If you have certain branded colors or a certain style aesthetic, just do a quick analysis to see how it performs on a black background. Maybe it looks better, maybe it doesn’t really make a drastic difference, but it’s worth keeping in mind.
Instagram Insights
If you have a business or creator profile (not a personal profile), click the three-line button menu in the top corner, then click on Insights to see your data and analytics.
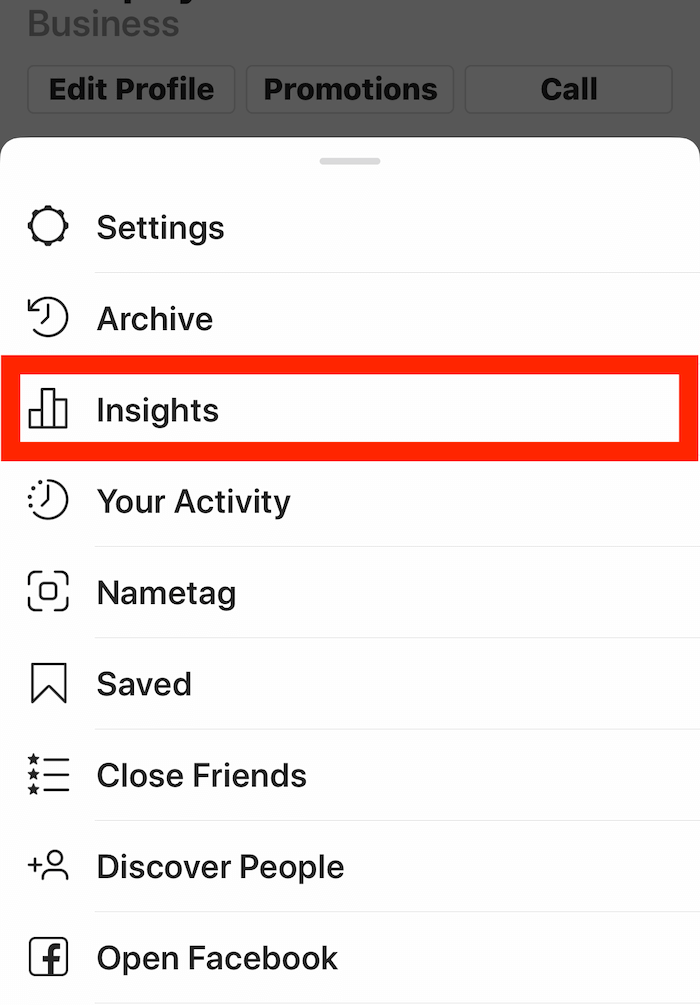
The very first tab is Content, which will show you your feed posts with Stories below. Click See All on the Content tab to open up all of your archived content that you’ve ever uploaded to Instagram since becoming a business profile. You can now sort how you view this content. At the very top, it defaults to a particular sort such as, “Showing all content for engagement in the last one year.” You can choose to filter it by content type and then sort based on engagement, likes, follows, comments, clicks, websites, or other options.
You can search up to 2 years back. Jenn often looks at a year’s worth of data but you can also look at intervals as short as 7 days. If you search by engagement, it will sort to show you your most engaged posts.
You can identify patterns—maybe every time you include your dog in the photo, you get crazy good engagement. But when you change that metric to sort for top-performing posts based on clicks for the last year, maybe you’ll see that your top click-generating posts contain a photo of you, not your dog.
The key thing to look at if you’re going for lead generation is website clicks—you want to know what’s driving conversions, not just engagement. Of course you want the high-engaging posts because that keeps your content relevant and high in the feed so when you do a conversion-based post, it will be seen. If everything is conversion-based, then you’re going to lose interest and reach. But you want to know, in terms of conversions, what’s more likely to drive those results, capture their attention, and actually get them to take that next step.
When you’re doing a post where you want people to take action on something, look at the metrics to ensure you’re creating the right type of content and the right types of captions. Do some A/B testing. If you’re running a contest or a campaign for a certain time period, try different captions and look at your metrics to find out which drove more clicks—the first sentence, the caption length, the call to action—you can now look at these stats. The next time you run a campaign, you can start to isolate what’s going to drive better results.
Analytics are currently only available on the phone. The current data is only ever for the last 7 days so you want to make sure you check your metrics on the same day each week if you’re tracking things like follower growth (general metrics are available for up to 2 years). If you use a third-party tool such as a dashboard management tool for metrics, that will allow you to look at metrics on your desktop and to look at some different data points.
Discovery of the Week
Instagram has announced a brand-new app called Threads. It’s a dedicated camera-based app from Instagram and a stand-alone for direct messages with your close friends. Threads is designed for privacy and speed, and for doing photos, video messages, and even stories with your Instagram close friends list. There is no public feed. It’s all private chat.
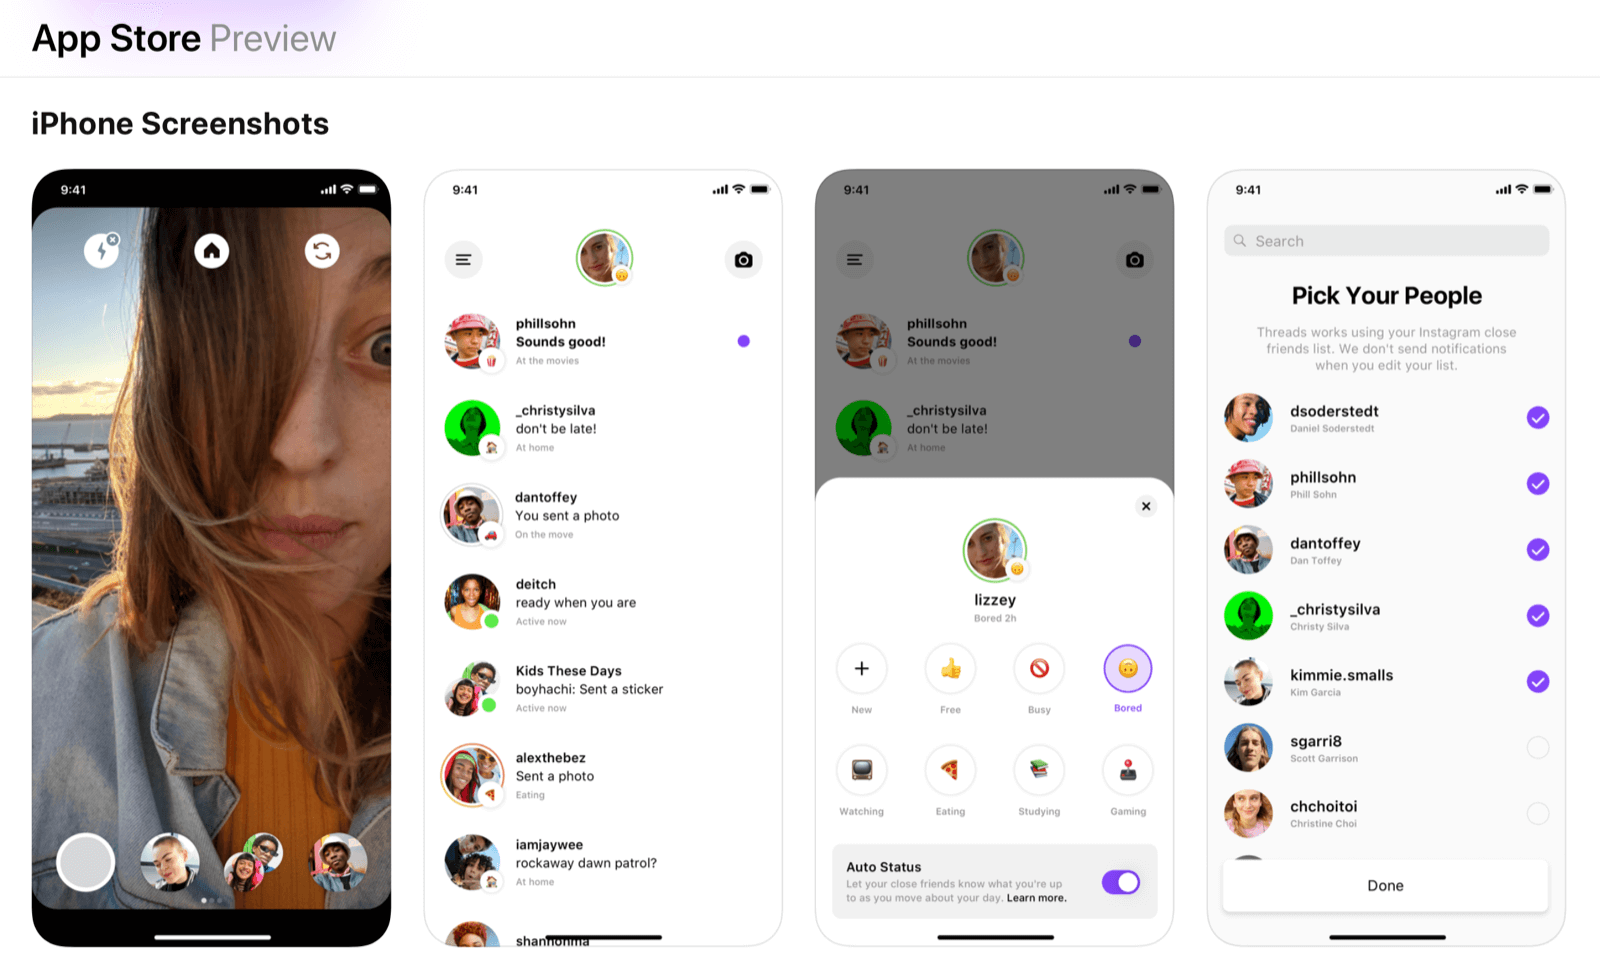
Threads is almost like Facebook Messenger for Instagram. The reason it’s called Threads is that you reply back and forth to stories on a conversation thread. You can turn on notifications for this app and leave them off on the Instagram app, so if you only want to get notified of a certain chat thread inside of Instagram with certain people, you can do that.
Threads leaves all of your DMs in the native Instagram app as well; this just adds an extra level. You can go over to this app instead of Instagram proper (and potentially get distracted by stories or the feed or the search) and just jump into direct messages only. You can also go to all of your DMs in this app, not just those designated as “close friends.” Just go to the settings and tap the triple-line hamburger menu and all of your DMs show up right there, too.
It’s got a few extra bells and whistles like statuses and different threads, but overall, it’s very simple and streamlined. If you don’t want to get bogged down by all of the other aspects of your Instagram life, but want to go back and forth quickly and easily and even allow notifications for DMs, you can do that with this app.
Shared from original article posted by Michael Stelzner https://www.socialmediaexaminer.com/how-to-use-instagram-generate-organic-leads-jenn-herman/
